Table of contents
Pre-requisites
There are a few pre-requisites for being able to use Doctor Drafts.
- You need to be using an Apple Mac.
- You need to have the Drafts application installed.
- If you wish to use all of the Doctor Drafts functionality, you will need to be a Pro Subscriber1 for Drafts.
- You will need to have the Alfred app2 installed.
- You will need to have the Alfred Powerpack to allow you to run workflows.
- Some of the more advanced, and arguably most useful, functionality that Doctor Drafts provides uses Python 3 script.
- macOS ships with the legacy Python 2 by default, and releases after Monterey may not ship with any Python support at all.
- If you have not previously installed Python 3, there is guidance for that below.
Installation
Installation of Doctor Drafts is very easy.
- Download the Doctor Drafts workflow file - Download Latest Version (1.11.0).
- Double click/open the downloaded file to install it in Alfred.
Python 3 Installation
If you have not installed Python 3 previously, you will almost certainly need to install it. To find out if you do have it, Doctor Drafts can run a system diagnostic by opening Alfred and entering the trigger keyword drdiag.
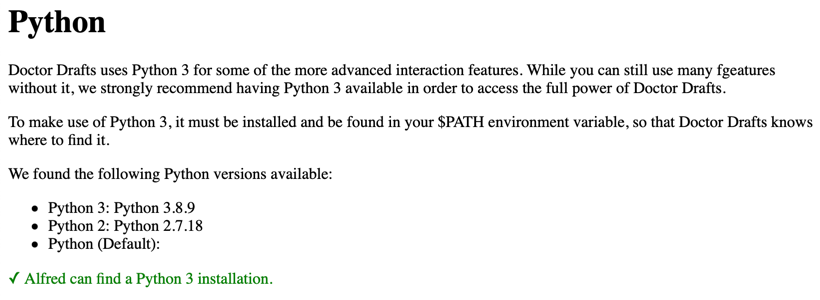
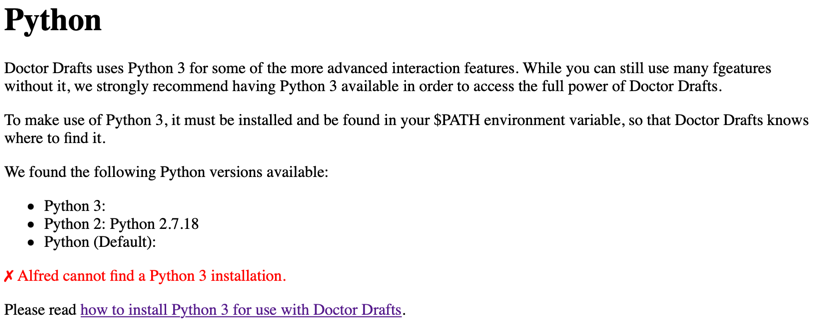
This will run some tests and open a report page in your web browser. There will be a section about Python.
It will either look something like the first screenshot below and give you a green tick to indicate that you have Python 3 set up and is usable by Alfred, or like in the second screenshot below and give you a red cross, an indication that you need to do the installation, and a link to this section of the installation guide.


Python has more than a few ways you can install and configure it. What we are going to walk through here is one method, and we think it is the one that most people find to be the least complex and most reliable. You may of course choose an alternative approach if you wish and there are many excellent tutorials online that will walk you through the processes.
The method described here will rely on the use of a popular macOS package manager called Homebrew. It’s like an app store for the command line (terminal) that gives you access to the more technical stuff that power users love to use - like a newer version of the Python programming language.
The installation will take a little time and it will be a start-stop process. Your Mac is going to be downloading software and installing it, and the pieces all chain together to make your Python 3 installation as simple as we can make it.
Step 1 - Install Xcode Command Line Tools
At a base level, your Mac can build applications and tools from code, but in order to do this it often needs to utilise some developer tools provided by Apple. The installation process for Python 3 is going to require these, so we should make sure that they are installed, assuming you have not already installed the latest version.
- Open the Terminal application (or another terminal supporting app if you prefer) on your Mac.
- Enter the following command and press return:
xcode-select —install. - A window will appear asking if you wish to install the command line developer tools. Select to install them.
The command line developer tools will then download and install.
Step 2 - Install Homebrew
If you already happen to have Homebrew installed on your mac, you can skip to the next step.
- Copy and paste the following command into the terminal and press return to run it.
/bin/bash -c "$(curl -fsSL https://raw.githubusercontent.com/Homebrew/install/HEAD/install.sh)"
This command was taken from the Homebrew installation instructions. Please do feel free to copy it from their page if you prefer, and note that this is running code on your Mac to carry out the installation. It is the standard way to do this and Homebrew is widely used, but as with many things on the Internet, the risk is yours and we are simply being explicit particularly since we do not have any control over the content of Homebrew’s installation commands.
Homebrew will then spend a few minutes downloading and installing on your Mac.
Step 3 - Install PyEnv
PyEnv is a free command line tool for managing your Python installations. Homebrew provides an easy way to install PyEnv.
- From the terminal, enter and run the following Homebrew install command.
brew install pyenv
After a few moments, PyEnv will have been installed.
Step 4 - Enable PynEnv Shim
In computer terms, a ‘shim’ is something you slip inline to change how something behaves. Here, we will be using a PyEnv shim to tell our Mac to use whatever PyEnv has configured as the current version of Python rather than what has been defined directly to the operating system. We are slipping it in to give us better control.
We can interact at the command line in the terminal using different programs/applications known as shells. The default shell for macOS is Zsh, (Z-shell), and for that reason, it was selected as the shell to be used by Doctor Drafts for interacting with Python (as well as running other scripts). We are therefore going to focus on setting up the shim for this shell. If you use other shells, and want to apply PyEnv to those, then you will need to add the appropriate additions to your run command (rc) file for your other shells.
- In the terminal, enter the following command to open the Zsh run command file in a standard command line editor called nano:
nano ~/.zshrc. - In your file you should have a line that begins
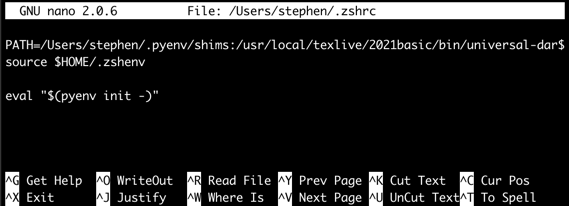
PATH=. After the=, insert the following text/Users/<your user id>/.pyenv/shims:. For example, my user name on my Mac is “Stephen”, so my entry is/Users/stephen/.pyenv/shims:. It is case sensitive, so be careful with what you enter. - At the end of the file, add the following line of code to initialise PyEnv and apply the Python version to the shell’s environment:
eval "$(pyenv init -)"After editing, your file content may look something like this:

- Press
CTRL + Xto start exiting nano. - Press
Yto confirm that you wish to save changes to the file. - Press return to write the updates to the file.
- Run the following command in the terminal to restart your current shell:
exec $SHELL- This will ensure that you pull in the new settings immediately if you made them for the current shell.
Step 5 - Identify the Version of Python 3 to Install
PyEnv has access to a set of Python builds it can install for you, and it can list them. However, the list is pretty long, and overly so for our needs. The best approach is typically to grab the latest stable Python 3 version so you have the latest security updates without being on the bleeding edge. To make this step a little simpler, we can use a complicated looking command to filter the list for us and identify which version to install.
- From the terminal, enter the following command and make a note of the result.
pyenv install --list | grep " 3.*" | grep -v "[A-Za-z]" | tail -n 1 | sed -e "s/ //g"
The command above lists all of the available versions, filters out anything that is not a 3.x version of Python, filters out all the developer versions, takes the last entry in the list (it is an ordered list, the latest version will be at the bottom), and then strips any spaces to just give you the version number.
Step 6 - Install Python 3
It has taken a few steps to get this point but now we can get PyEnv to get the version of Python 3 we want to install from HomeBrew, and build it into our system utilising the XCode developer tools.
- From the terminal, enter
pyenv install <version>to install the Python 3 version you require - e.g.pyenv install 3.10.0.
A short while later you will have Python 3 installed on your Mac.
Step 7 - Set Version
PyEnv actually allows you to switch easily between Python versions you have installed, and it is generally a good idea to default to the latest version you have installed unless you have a particular reason not to.
- From the terminal, enter
pyenv global <version>to specify the default Python version you want to use - e.g.pyenv global 3.10.0.
You can list the available Python versions using the
pyenv versionscommand, and the default version is indicated by a leading asterisk.
Step 8 - Update PIP
Earlier we mentioned that Homebrew was a package manager. Well PIP is also a package manager, but specifically for Python. Just to round everything off, we’re going to ensure that this is all up to date as well.
- From the terminal, enter
pip3 install --upgrade pip.
Note that should you happen to see a deprecation warning when you run this command you should not panic. Everything is fine, and by the time the deprecation it is referring to occurs (the Python 3.12 release), the Homebrew developers will have put in place the changes to support the changes that this warning refers to. It is just a warning and not an error.
What Now?
Read through the rest of the documentation on this site, at least this ‘Basic Use’ section to find out what you can do with Doctor Drafts. The best way to do this is probably just to work your way down the entries in this section, with The Basics being up next.
-
Some of the Drafts automation options used by Doctor Drafts are only available as part of the pro subscription. It is highly recommended to become a Pro Subscriber, but there is a monthly option if you would just like the chance to check out what you get for a few weeks rather than a longer term commitment (i.e. annual). ↩
-
From version 1.9.0 onwards, Doctor Drafts requires Alfred 5. Earlier versions (available from the change log page), are compatible with Alfred 4. ↩
